> ## Documentation Index
> Fetch the complete documentation index at: https://docs.odigos.io/llms.txt
> Use this file to discover all available pages before exploring further.
# Role Mappings
> Automatically assign Odigos Central roles to users based on their Azure AD (Entra ID) group membership.
Role mappings let you grant Odigos Central roles automatically based on the **groups** a user belongs to in Azure AD (Entra ID). For example, members of your `odigos-admins` group can be granted the **Admin** role on sign-in, with no per-user configuration.
Roles are evaluated on **every login**, so changes to a user's group membership (or to the mappings themselves) take effect the next time they sign in.
Role mappings require Azure AD configured as an OIDC SSO provider. See
[Authentication](./authentication) to set that up first.
## Roles
| Role | Capabilities |
| -------------- | ------------------------------------------------------- |
| **Admin** | Full access, including managing users and role mappings |
| **Maintainer** | Manage sources, destinations, and configuration |
| **Viewer** | Read-only access |
When a user belongs to multiple mapped groups, the **highest** role wins. Precedence is: **Owner > Admin > Maintainer > Viewer**.
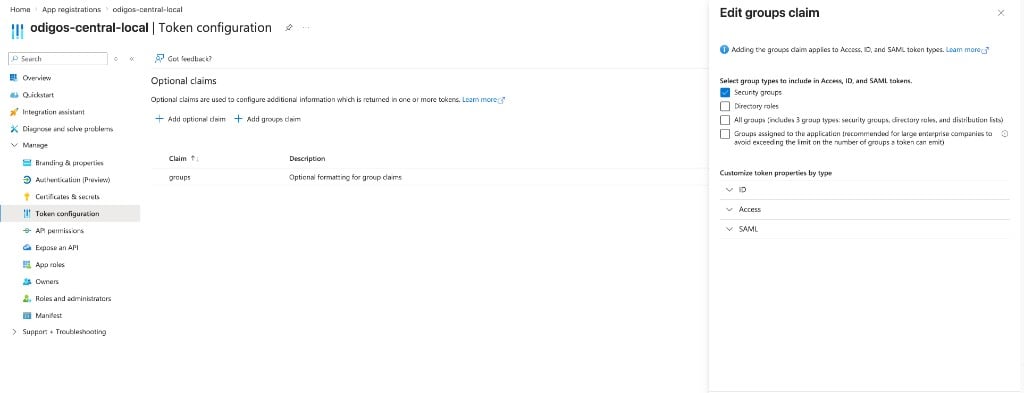
## Configuring Azure AD group claims
For role mappings to work, Azure must include the user's groups in the token it sends to Odigos.
In the Azure portal, open your App Registration → **Token configuration** → **Add groups claim**. Choose the groups to emit (e.g. *Security groups*) for both the **ID** and **Access** tokens.
 The value you map must exactly match what Azure puts in the `groups` claim. By **default** Azure emits the group **Object ID** (a GUID) — copy it from Azure AD → **Groups**. If you've configured the groups claim to emit names instead (e.g. *Cloud-only group display names*, or `sAMAccountName` for on-prem-synced groups), use the group **name** instead. Either way, paste that exact value into the **Group** field.
Azure uses `groups` as the claim name by default, which matches the Odigos
default. If you've customized the claim name, set it in the **Claim Name**
field when creating a mapping.
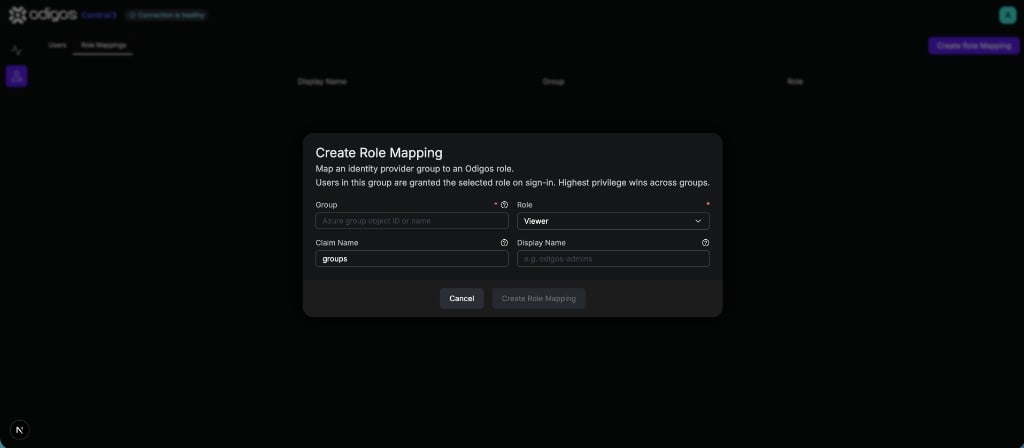
## Creating a role mapping
In the Central UI, go to **Access Management** and select the **Role Mappings** tab.
Click **Create Role Mapping** and fill in:
* **Group** — the value from the previous step: the group **Object ID** (GUID) by default, or the group **name** if Azure emits names. It must exactly match what Azure puts in the claim.
* **Role** — the Odigos role to grant: **Admin**, **Maintainer**, or **Viewer**.
* **Claim Name** — the token claim that carries group membership. Defaults to `groups`.
* **Display Name** *(optional)* — a friendly label shown in the table instead of the raw group value. This does **not** affect matching.
The value you map must exactly match what Azure puts in the `groups` claim. By **default** Azure emits the group **Object ID** (a GUID) — copy it from Azure AD → **Groups**. If you've configured the groups claim to emit names instead (e.g. *Cloud-only group display names*, or `sAMAccountName` for on-prem-synced groups), use the group **name** instead. Either way, paste that exact value into the **Group** field.
Azure uses `groups` as the claim name by default, which matches the Odigos
default. If you've customized the claim name, set it in the **Claim Name**
field when creating a mapping.
## Creating a role mapping
In the Central UI, go to **Access Management** and select the **Role Mappings** tab.
Click **Create Role Mapping** and fill in:
* **Group** — the value from the previous step: the group **Object ID** (GUID) by default, or the group **name** if Azure emits names. It must exactly match what Azure puts in the claim.
* **Role** — the Odigos role to grant: **Admin**, **Maintainer**, or **Viewer**.
* **Claim Name** — the token claim that carries group membership. Defaults to `groups`.
* **Display Name** *(optional)* — a friendly label shown in the table instead of the raw group value. This does **not** affect matching.
 Save the mapping. Affected users receive their role the next time they sign in.
Only **Admins** can create, edit, or delete role mappings. Viewers can see the
mappings in read-only mode.
## How it works
Odigos manages the group-to-role assignment in the bundled Keycloak for you — you don't need to configure Keycloak directly. On each login, Keycloak re-evaluates the user's group claim against your mappings and assigns the matching role (highest privilege wins). Removing a mapping strips the corresponding role on the user's next sign-in.
Save the mapping. Affected users receive their role the next time they sign in.
Only **Admins** can create, edit, or delete role mappings. Viewers can see the
mappings in read-only mode.
## How it works
Odigos manages the group-to-role assignment in the bundled Keycloak for you — you don't need to configure Keycloak directly. On each login, Keycloak re-evaluates the user's group claim against your mappings and assigns the matching role (highest privilege wins). Removing a mapping strips the corresponding role on the user's next sign-in.