> ## Documentation Index
> Fetch the complete documentation index at: https://docs.odigos.io/llms.txt
> Use this file to discover all available pages before exploring further.
# Add an AWS Connector
> Connect an AWS account to Odigos Central, configure authentication and capabilities, and verify discovery.
Add an AWS Cloud Connector to manage AWS accounts. The connector runs in the Central cluster, discovers resources across every region enabled in that account, and can instrument AWS Lambda functions when you create Sources.
[Enable Cloud Connectors](/cloud-connectors/enable)
before you add a connector.
## Resource types
| Type | Domain | Discovery | Instrumentation |
| --------------------- | ---------------- | --------- | -------------------------------- |
| `aws.lambda` | Workload | Yes | Yes (OpenTelemetry Lambda layer) |
| `aws.fargate-task` | Workload | Yes | Coming soon |
| `aws.ecs-cluster` | Compute platform | Yes | Coming soon |
| `aws.fargate-cluster` | Compute platform | Yes | Coming soon |
## Add the connector
In the Central UI, open Connections / Connectors and start **Add connector**. Choose **AWS**.
Choose how much access this connector should have. The UI shows an **example IAM permissions policy** for the level you pick. You will attach that policy when you create the IAM role or user in the next step.
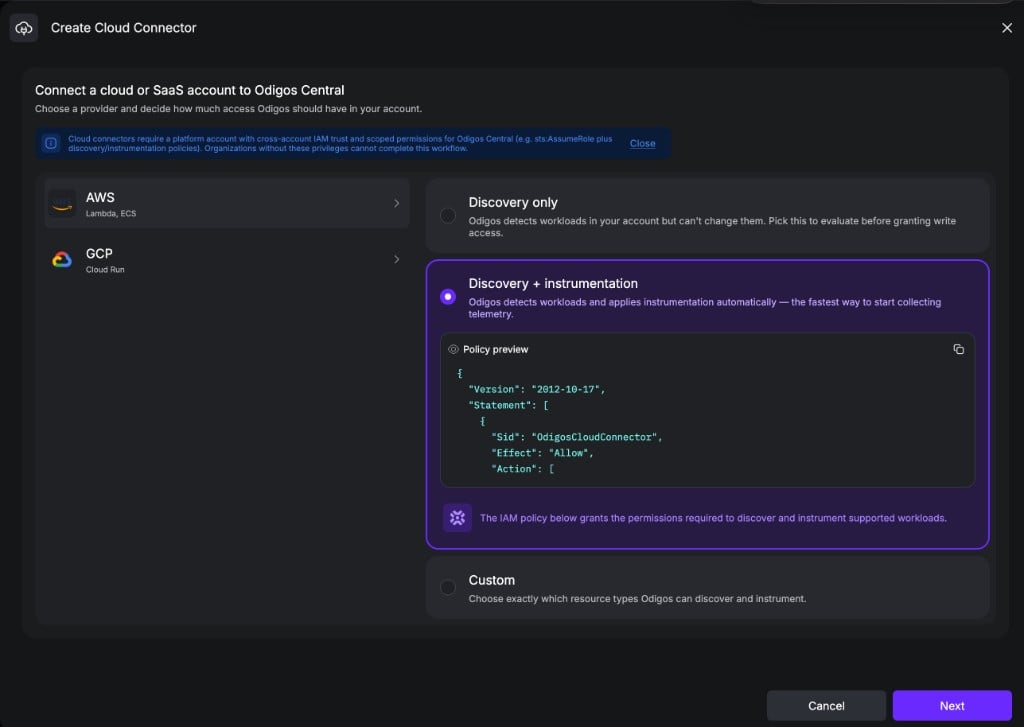 The connector can list and discover resources (e.g. Lambda functions and ECS/Fargate resources) but cannot change them or attach instrumentation.
Use this when you want inventory and visibility first, or if you are managing the environment with Infrastructure as code (IaC).
Typical policy actions include:
| Purpose | Actions |
| ----------------------- | ---------------------------------------------------------------------------------------------------------------------------- |
| Authentication | `sts:GetCallerIdentity` |
| Region enumeration | `ec2:DescribeRegions` |
| Lambda discovery | `lambda:ListFunctions` |
| ECS / Fargate discovery | `ecs:ListClusters`, `ecs:DescribeClusters`, `ecs:ListServices`, `ecs:DescribeServices`, `ecs:ListTasks`, `ecs:DescribeTasks` |
The connector can discover resources and instrument supported workloads. Prefer this for a full setup in one step.
Includes all discovery actions, plus Lambda instrumentation:
| Purpose | Actions |
| ------------------------------- | -------------------------------------------------------------------------------------------------------- |
| Read and update function config | `lambda:GetFunctionConfiguration`, `lambda:UpdateFunctionConfiguration` |
| Manage OTel layers | `lambda:GetLayerVersion`, `lambda:ListLayers`, `lambda:PublishLayerVersion`, `lambda:DeleteLayerVersion` |
Lambda instrumentation also requires an [OTLP destination](/cloud-connectors/instrument-workloads#add-an-otlp-destination) after the connector is online.
Pick which resource types may be discovered and which may be instrumented. The UI updates the **policy preview** to match your selections so the IAM policy stays aligned with what verification will validate.
Use Custom when you need a narrower or broader mix than the presets (e.g. discover ECS clusters but only instrument Lambda).
Use the policy preview as the source of truth for the permissions policy.
This keeps connector access scoped — not blanket account admin. See
[You control the access scope](/cloud-connectors/overview#you-control-the-access-scope).
Click **Next** to continue to **Setup credentials**.
On the **Setup credentials** screen, apply the IAM policy from the previous step in your AWS account and enter the credentials Odigos will use.
The connector can list and discover resources (e.g. Lambda functions and ECS/Fargate resources) but cannot change them or attach instrumentation.
Use this when you want inventory and visibility first, or if you are managing the environment with Infrastructure as code (IaC).
Typical policy actions include:
| Purpose | Actions |
| ----------------------- | ---------------------------------------------------------------------------------------------------------------------------- |
| Authentication | `sts:GetCallerIdentity` |
| Region enumeration | `ec2:DescribeRegions` |
| Lambda discovery | `lambda:ListFunctions` |
| ECS / Fargate discovery | `ecs:ListClusters`, `ecs:DescribeClusters`, `ecs:ListServices`, `ecs:DescribeServices`, `ecs:ListTasks`, `ecs:DescribeTasks` |
The connector can discover resources and instrument supported workloads. Prefer this for a full setup in one step.
Includes all discovery actions, plus Lambda instrumentation:
| Purpose | Actions |
| ------------------------------- | -------------------------------------------------------------------------------------------------------- |
| Read and update function config | `lambda:GetFunctionConfiguration`, `lambda:UpdateFunctionConfiguration` |
| Manage OTel layers | `lambda:GetLayerVersion`, `lambda:ListLayers`, `lambda:PublishLayerVersion`, `lambda:DeleteLayerVersion` |
Lambda instrumentation also requires an [OTLP destination](/cloud-connectors/instrument-workloads#add-an-otlp-destination) after the connector is online.
Pick which resource types may be discovered and which may be instrumented. The UI updates the **policy preview** to match your selections so the IAM policy stays aligned with what verification will validate.
Use Custom when you need a narrower or broader mix than the presets (e.g. discover ECS clusters but only instrument Lambda).
Use the policy preview as the source of truth for the permissions policy.
This keeps connector access scoped — not blanket account admin. See
[You control the access scope](/cloud-connectors/overview#you-control-the-access-scope).
Click **Next** to continue to **Setup credentials**.
On the **Setup credentials** screen, apply the IAM policy from the previous step in your AWS account and enter the credentials Odigos will use.
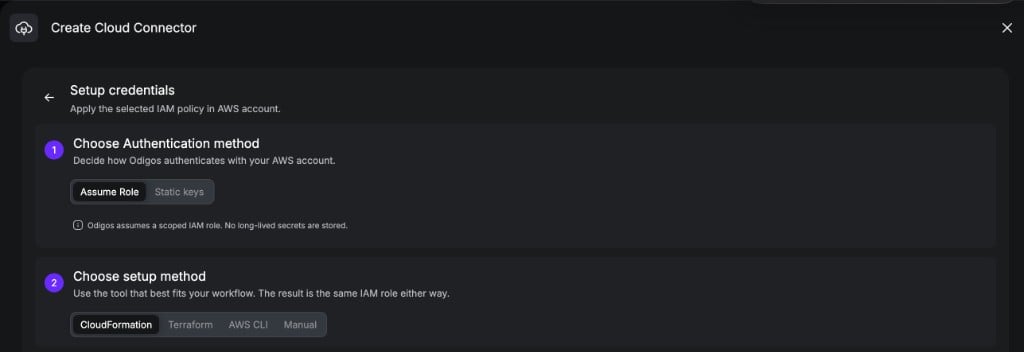 #### 1. Choose authentication method
Odigos assumes a scoped IAM role. Prefer this for production: you attach the permissions policy to the role, and Odigos does not rely on long-lived admin credentials in the connector.
You still provide base access keys that are allowed to call `sts:AssumeRole` on that role (plus the Role ARN and External ID).
#### 2. Choose setup method
Use the tool that best fits your workflow — **CloudFormation**, **Terraform**, **AWS CLI**, or **Manual**. Each path ends with the same role (trust policy + access-level permissions) and a Role ARN to paste back into Odigos.
#### 3. Create IAM role
Follow the instructions the UI shows for the method you picked, then copy the **Role ARN**.
1. Open the CloudFormation instructions in the UI.
2. Deploy the provided template (or stack) in the target AWS account.
3. Confirm the stack created the IAM role with the UI trust policy and the permissions policy from the access level step.
4. Copy the **Role ARN** from the stack outputs or the IAM console.
1. Open the Terraform snippet in the UI.
2. Apply it in the target account or module.
3. Confirm the role was created with the UI trust policy and the permissions policy from the access level step.
4. Copy the **Role ARN** from the Terraform output or the IAM console.
1. Open the AWS CLI commands in the UI.
2. Run them against the target account (creates the role, trust policy, and attaches permissions).
3. Confirm the commands completed successfully.
4. Copy the **Role ARN** from the command output or the IAM console.
1. Open the AWS Console → IAM → Roles → Create role.
2. Select **Custom trust policy**.
3. Paste the trust policy from the UI (includes the External ID condition when present).
4. Attach the **permissions policy from the access level step**.
5. Name the role and create it.
6. Open the role summary and copy the **Role ARN**.
#### 1. Choose authentication method
Odigos assumes a scoped IAM role. Prefer this for production: you attach the permissions policy to the role, and Odigos does not rely on long-lived admin credentials in the connector.
You still provide base access keys that are allowed to call `sts:AssumeRole` on that role (plus the Role ARN and External ID).
#### 2. Choose setup method
Use the tool that best fits your workflow — **CloudFormation**, **Terraform**, **AWS CLI**, or **Manual**. Each path ends with the same role (trust policy + access-level permissions) and a Role ARN to paste back into Odigos.
#### 3. Create IAM role
Follow the instructions the UI shows for the method you picked, then copy the **Role ARN**.
1. Open the CloudFormation instructions in the UI.
2. Deploy the provided template (or stack) in the target AWS account.
3. Confirm the stack created the IAM role with the UI trust policy and the permissions policy from the access level step.
4. Copy the **Role ARN** from the stack outputs or the IAM console.
1. Open the Terraform snippet in the UI.
2. Apply it in the target account or module.
3. Confirm the role was created with the UI trust policy and the permissions policy from the access level step.
4. Copy the **Role ARN** from the Terraform output or the IAM console.
1. Open the AWS CLI commands in the UI.
2. Run them against the target account (creates the role, trust policy, and attaches permissions).
3. Confirm the commands completed successfully.
4. Copy the **Role ARN** from the command output or the IAM console.
1. Open the AWS Console → IAM → Roles → Create role.
2. Select **Custom trust policy**.
3. Paste the trust policy from the UI (includes the External ID condition when present).
4. Attach the **permissions policy from the access level step**.
5. Name the role and create it.
6. Open the role summary and copy the **Role ARN**.
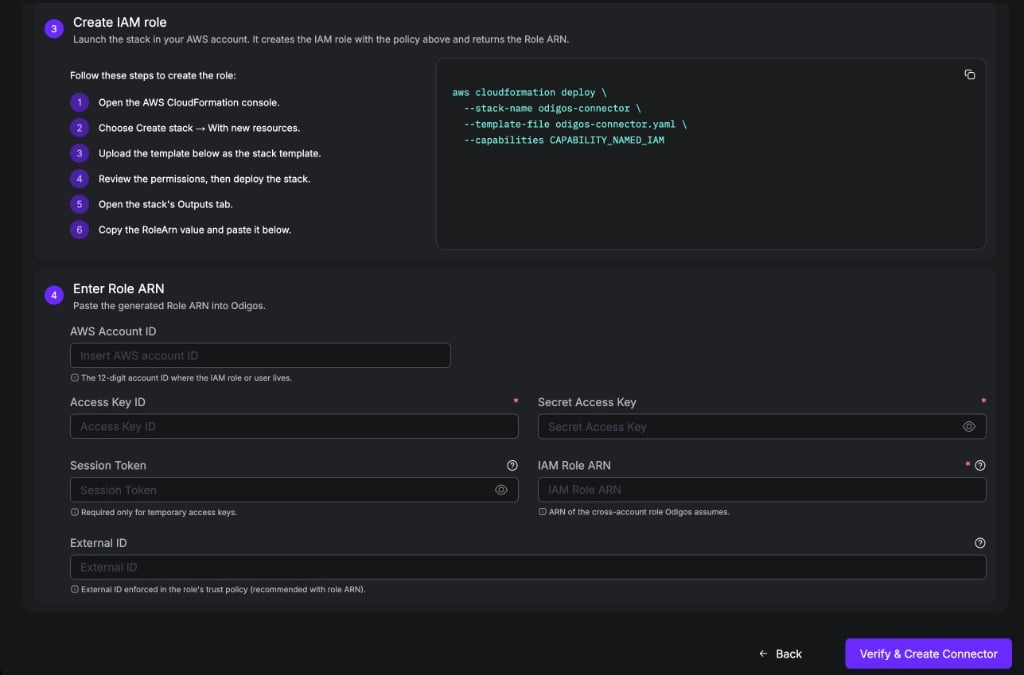 #### 4. Enter Role ARN
Paste the values from the previous step into the form — account ID, base access keys, the Role ARN you copied, and the External ID from the UI trust policy.
The 12-digit account ID where the IAM role lives.
Access key for an identity that can assume the role.
Secret access key for that identity.
Required only for temporary access keys.
ARN of the cross-account role Odigos assumes.
Must match the External ID in the role trust policy (shown in the UI, e.g. `odigos-connector`).
Use IAM user access keys that already have the permissions policy from the access level step attached. There is no separate role setup flow in the UI for this method.
1. In AWS, create or select an IAM user.
2. Attach the **permissions policy from the access level step**.
3. Create an access key for that user.
4. Enter the credentials in Odigos:
The 12-digit account ID where the IAM user lives.
IAM user access key ID.
IAM user secret access key.
Required only for temporary access keys.
Credentials are stored in a Kubernetes Secret in the Central cluster — never in the connector spec.
Click **Verify & Create Connector**. Central runs connection checks, then creates the credentials Secret and `OdigosCloudConnector` resource when verification succeeds.
Verification covers authentication and discovery permissions for the access
level you selected. For **Discovery + instrumentation**, also ensure the
instrumentation actions from the policy preview are on the role before you
create Sources.
After create succeeds, wait until the connector status is **Connected** and initial discovery has completed.
When the connector shows Connected, you can browse discovered workloads and
start [instrumenting](/cloud-connectors/instrument-workloads).
## Next steps
Add an OTLP destination, create Sources for discovered Lambdas, and track instrumentation.
#### 4. Enter Role ARN
Paste the values from the previous step into the form — account ID, base access keys, the Role ARN you copied, and the External ID from the UI trust policy.
The 12-digit account ID where the IAM role lives.
Access key for an identity that can assume the role.
Secret access key for that identity.
Required only for temporary access keys.
ARN of the cross-account role Odigos assumes.
Must match the External ID in the role trust policy (shown in the UI, e.g. `odigos-connector`).
Use IAM user access keys that already have the permissions policy from the access level step attached. There is no separate role setup flow in the UI for this method.
1. In AWS, create or select an IAM user.
2. Attach the **permissions policy from the access level step**.
3. Create an access key for that user.
4. Enter the credentials in Odigos:
The 12-digit account ID where the IAM user lives.
IAM user access key ID.
IAM user secret access key.
Required only for temporary access keys.
Credentials are stored in a Kubernetes Secret in the Central cluster — never in the connector spec.
Click **Verify & Create Connector**. Central runs connection checks, then creates the credentials Secret and `OdigosCloudConnector` resource when verification succeeds.
Verification covers authentication and discovery permissions for the access
level you selected. For **Discovery + instrumentation**, also ensure the
instrumentation actions from the policy preview are on the role before you
create Sources.
After create succeeds, wait until the connector status is **Connected** and initial discovery has completed.
When the connector shows Connected, you can browse discovered workloads and
start [instrumenting](/cloud-connectors/instrument-workloads).
## Next steps
Add an OTLP destination, create Sources for discovered Lambdas, and track instrumentation.