> ## Documentation Index
> Fetch the complete documentation index at: https://docs.odigos.io/llms.txt
> Use this file to discover all available pages before exploring further.
# Add a GCP Connector
> Connect a Google Cloud project to Odigos Central, configure authentication and capabilities, and verify discovery.
Add a GCP Cloud Connector to manage **one Google Cloud project**. The connector runs in the Central cluster, discovers resources across every location in that project, and can instrument Cloud Run services when you create Sources.
[Enable Cloud Connectors](/cloud-connectors/enable)
before you add a connector.
## Resource types
| Type | Domain | Discovery | Instrumentation |
| --------------- | ---------------- | --------- | --------------------------------- |
| `gcp.cloud-run` | Workload | Yes | Yes (Java, Python, Node.js, .NET) |
| `gcp.gke` | Compute platform | Yes | Agent install coming soon |
| `gcp.gce` | Compute platform | Yes | Agent install coming soon |
## Add the connector
In the Central UI, open Connections / Connectors and start **Add connector**. Choose **GCP**.
Choose how much access this connector should have. The UI shows an **example IAM policy** for the level you pick. You will grant that role to the connector identity in the next step.
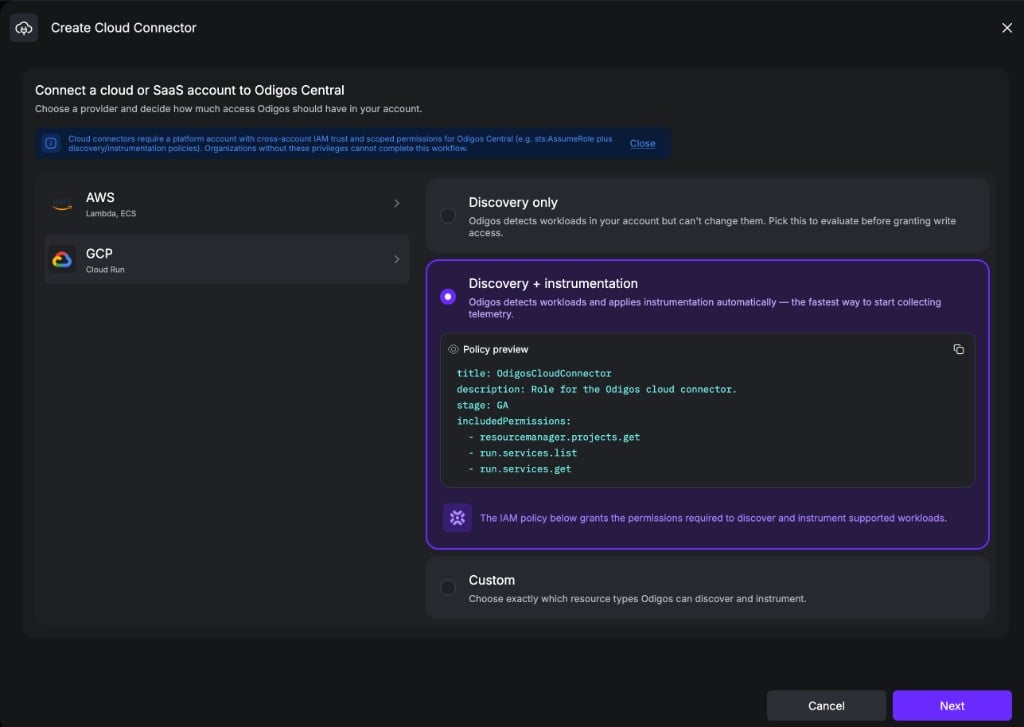 The connector can list and read resources (e.g. Cloud Run services, GKE clusters, and Compute Engine instances) but cannot change them or attach instrumentation.
Use this when you want inventory and visibility first, or when a separate identity will handle instrumentation later.
Typical permissions include:
| Purpose | Permissions |
| ------------------------------- | --------------------------------------------------- |
| Authentication / project access | `resourcemanager.projects.get` |
| Cloud Run discovery | `run.services.list`, `run.services.get` |
| GKE discovery | `container.clusters.list`, `container.clusters.get` |
| Compute Engine discovery | `compute.instances.list` |
The connector can discover resources and instrument supported workloads. Prefer this for a full setup in one step.
Includes all discovery permissions, plus Cloud Run instrumentation:
| Purpose | Permissions |
| ------------------------------ | -------------------------------------------------------------------------------------- |
| Update services | `run.services.get`, `run.services.update`, `run.operations.get` |
| Act as runtime service account | **`iam.serviceAccounts.actAs`** |
| Language detection (optional) | `artifactregistry.repositories.downloadArtifacts` (or `roles/artifactregistry.reader`) |
`iam.serviceAccounts.actAs` is required to update Cloud Run services that
run as a runtime service account. Without it, instrumentation fails even
when `run.services.update` is granted. Bind it in a custom role, or grant
`roles/iam.serviceAccountUser` on the runtime service account.
Cloud Run instrumentation also requires an [OTLP destination](/cloud-connectors/instrument-workloads#add-an-otlp-destination) after the connector is online. That endpoint must be reachable **from Cloud Run**, because instrumented services export OTLP directly to it.
Pick which resource types may be discovered and which may be instrumented. The UI updates the **policy preview** to match your selections so the IAM role stays aligned with what verification will validate.
Use Custom when you need a narrower or broader mix than the presets (e.g. discover GKE clusters but only instrument Cloud Run).
Use the policy preview as the source of truth for the custom role. This
keeps connector access scoped — not blanket project owner. See
[You control the access scope](/cloud-connectors/overview#you-control-the-access-scope).
Enable the Cloud Run, Cloud Resource Manager, Container, Compute, and IAM APIs in the project as needed, then click **Next** to continue to **Setup credentials**.
On the **Setup credentials** screen, identify the project and enter the identity Odigos uses to access it.
The connector can list and read resources (e.g. Cloud Run services, GKE clusters, and Compute Engine instances) but cannot change them or attach instrumentation.
Use this when you want inventory and visibility first, or when a separate identity will handle instrumentation later.
Typical permissions include:
| Purpose | Permissions |
| ------------------------------- | --------------------------------------------------- |
| Authentication / project access | `resourcemanager.projects.get` |
| Cloud Run discovery | `run.services.list`, `run.services.get` |
| GKE discovery | `container.clusters.list`, `container.clusters.get` |
| Compute Engine discovery | `compute.instances.list` |
The connector can discover resources and instrument supported workloads. Prefer this for a full setup in one step.
Includes all discovery permissions, plus Cloud Run instrumentation:
| Purpose | Permissions |
| ------------------------------ | -------------------------------------------------------------------------------------- |
| Update services | `run.services.get`, `run.services.update`, `run.operations.get` |
| Act as runtime service account | **`iam.serviceAccounts.actAs`** |
| Language detection (optional) | `artifactregistry.repositories.downloadArtifacts` (or `roles/artifactregistry.reader`) |
`iam.serviceAccounts.actAs` is required to update Cloud Run services that
run as a runtime service account. Without it, instrumentation fails even
when `run.services.update` is granted. Bind it in a custom role, or grant
`roles/iam.serviceAccountUser` on the runtime service account.
Cloud Run instrumentation also requires an [OTLP destination](/cloud-connectors/instrument-workloads#add-an-otlp-destination) after the connector is online. That endpoint must be reachable **from Cloud Run**, because instrumented services export OTLP directly to it.
Pick which resource types may be discovered and which may be instrumented. The UI updates the **policy preview** to match your selections so the IAM role stays aligned with what verification will validate.
Use Custom when you need a narrower or broader mix than the presets (e.g. discover GKE clusters but only instrument Cloud Run).
Use the policy preview as the source of truth for the custom role. This
keeps connector access scoped — not blanket project owner. See
[You control the access scope](/cloud-connectors/overview#you-control-the-access-scope).
Enable the Cloud Run, Cloud Resource Manager, Container, Compute, and IAM APIs in the project as needed, then click **Next** to continue to **Setup credentials**.
On the **Setup credentials** screen, identify the project and enter the identity Odigos uses to access it.
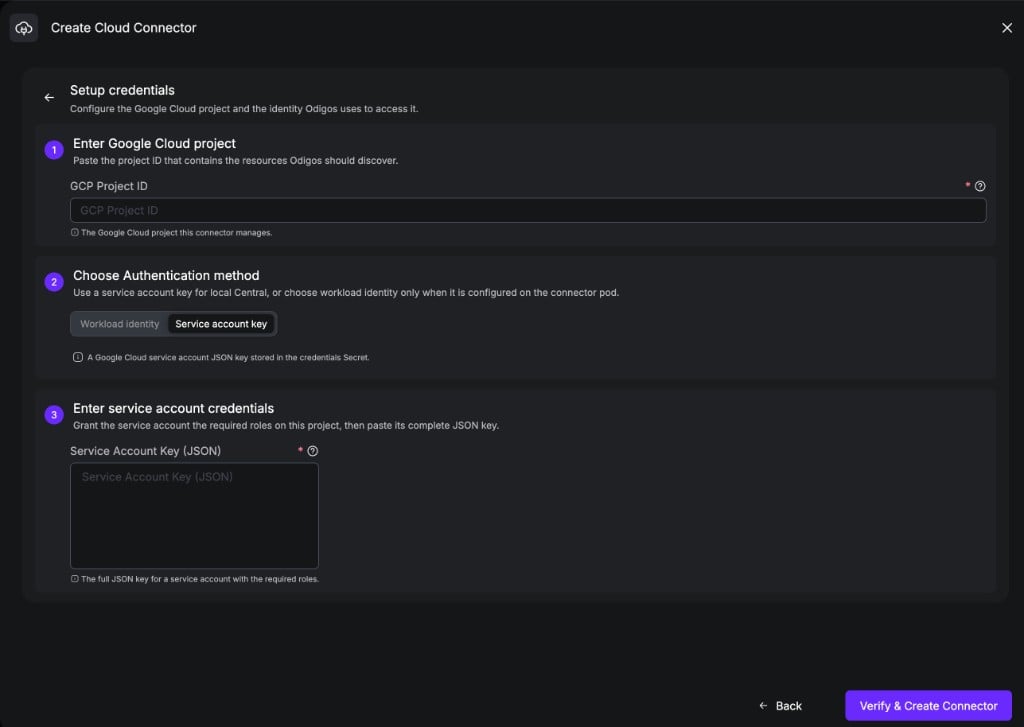 #### 1. Enter Google Cloud project
The Google Cloud project that contains the resources Odigos should discover.
#### 2. Choose authentication method
Use a service account key for local Central, or choose workload identity only when it is configured on the connector pod.
Odigos uses the connector pod's ambient credentials — [GKE Workload Identity](https://cloud.google.com/kubernetes-engine/docs/how-to/workload-identity) or Application Default Credentials. Prefer this when Central runs on GKE and you do not want a long-lived key in the cluster.
1. Create a Google Cloud service account (or reuse one) and grant it the **IAM role from the access level step**.
2. Bind that service account to the connector pod's Kubernetes service account via Workload Identity (or ensure ADC is otherwise available to the pod).
3. Select **Workload identity** in Odigos. Do **not** paste a JSON key — no credentials Secret is created for this method.
A kind or non-GKE Central cluster has no ambient GCP identity. Use
**Service account key** instead.
Use a JSON key for a dedicated service account. Prefer this for local Central (for example kind) or any cluster without Workload Identity / ADC.
1. Create a Google Cloud service account in the target project.
2. Grant it the **IAM role from the access level step**.
3. Create a JSON key for that service account.
4. Select **Service account key** in Odigos and paste the complete JSON key.
The full JSON key for a service account with the required roles.
The key is stored in a Kubernetes Secret in the Central cluster — never in the connector spec.
Click **Verify & Create Connector**. Central runs connection checks, then creates the `OdigosCloudConnector` resource when verification succeeds. For **Service account key**, it also writes the credentials Secret; for **Workload identity**, no Secret is created.
Verification covers authentication and discovery permissions for the access
level you selected. For **Discovery + instrumentation**, also ensure the
instrumentation permissions from the policy preview (including
`iam.serviceAccounts.actAs`) are granted before you create Sources.
After create succeeds, wait until the connector status is **Connected** and initial discovery has completed.
When the connector shows Connected, you can browse discovered workloads and
start [instrumenting](/cloud-connectors/instrument-workloads).
## Next steps
Add an OTLP destination, create Sources for discovered Cloud Run services, and track instrumentation.
#### 1. Enter Google Cloud project
The Google Cloud project that contains the resources Odigos should discover.
#### 2. Choose authentication method
Use a service account key for local Central, or choose workload identity only when it is configured on the connector pod.
Odigos uses the connector pod's ambient credentials — [GKE Workload Identity](https://cloud.google.com/kubernetes-engine/docs/how-to/workload-identity) or Application Default Credentials. Prefer this when Central runs on GKE and you do not want a long-lived key in the cluster.
1. Create a Google Cloud service account (or reuse one) and grant it the **IAM role from the access level step**.
2. Bind that service account to the connector pod's Kubernetes service account via Workload Identity (or ensure ADC is otherwise available to the pod).
3. Select **Workload identity** in Odigos. Do **not** paste a JSON key — no credentials Secret is created for this method.
A kind or non-GKE Central cluster has no ambient GCP identity. Use
**Service account key** instead.
Use a JSON key for a dedicated service account. Prefer this for local Central (for example kind) or any cluster without Workload Identity / ADC.
1. Create a Google Cloud service account in the target project.
2. Grant it the **IAM role from the access level step**.
3. Create a JSON key for that service account.
4. Select **Service account key** in Odigos and paste the complete JSON key.
The full JSON key for a service account with the required roles.
The key is stored in a Kubernetes Secret in the Central cluster — never in the connector spec.
Click **Verify & Create Connector**. Central runs connection checks, then creates the `OdigosCloudConnector` resource when verification succeeds. For **Service account key**, it also writes the credentials Secret; for **Workload identity**, no Secret is created.
Verification covers authentication and discovery permissions for the access
level you selected. For **Discovery + instrumentation**, also ensure the
instrumentation permissions from the policy preview (including
`iam.serviceAccounts.actAs`) are granted before you create Sources.
After create succeeds, wait until the connector status is **Connected** and initial discovery has completed.
When the connector shows Connected, you can browse discovered workloads and
start [instrumenting](/cloud-connectors/instrument-workloads).
## Next steps
Add an OTLP destination, create Sources for discovered Cloud Run services, and track instrumentation.