> ## Documentation Index
> Fetch the complete documentation index at: https://docs.odigos.io/llms.txt
> Use this file to discover all available pages before exploring further.
# Honeycomb
> Configuring the Honeycomb backend (Managed)
### Getting Started
 **Where to find the data**
* Each Odigos destination send collected telemetry to a **single environment** in Honeycomb.
* The collected telemetry will go into Honeycomb [datasets](https://docs.honeycomb.io/configure/datasets/manage/) based on the `service.name` resource attribute. odigos will set it by default to the k8s workload (deployment) name (or as set in source configuration).
**Login to Honeycomb**
**Where to find the data**
* Each Odigos destination send collected telemetry to a **single environment** in Honeycomb.
* The collected telemetry will go into Honeycomb [datasets](https://docs.honeycomb.io/configure/datasets/manage/) based on the `service.name` resource attribute. odigos will set it by default to the k8s workload (deployment) name (or as set in source configuration).
**Login to Honeycomb**
Go to the **[🔗 website](https://ui.honeycomb.io)** and login/create your honeycomb account.
You can start with the Free plan to test sending traces, logs and metrics without needing to provide a credit card.
**Select Environment**
Honeycomb uses [environments](https://docs.honeycomb.io/configure/environments/manage/) to partition and organize data.
Common environments includes `staging`, `production`, `development`, `integration`, or you might want to include the cluster/unit name
to group and isolate telemetry that is unrelated.
Each Odigos Honeycomb destination always sends the data to a **single environment**, based on the "API Key" it is configured with.
Before creating your API Key, make sure to select in ui the environment you want your odigos collected telemetry to show up in.
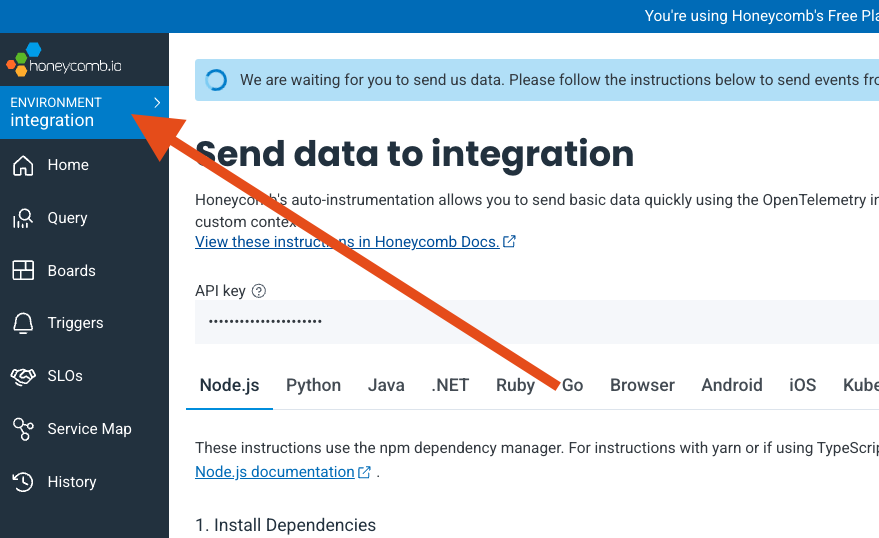 **Obtaining Honeycomb API Key**
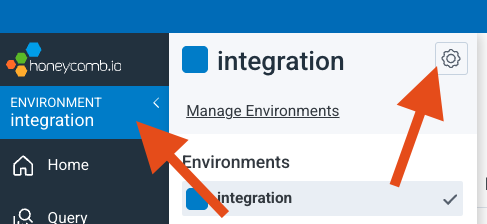
From the top left corner click on the ENVIRONMENT, and click the **Settings** configuration gear icon to go to the settings page.
**Obtaining Honeycomb API Key**
From the top left corner click on the ENVIRONMENT, and click the **Settings** configuration gear icon to go to the settings page.
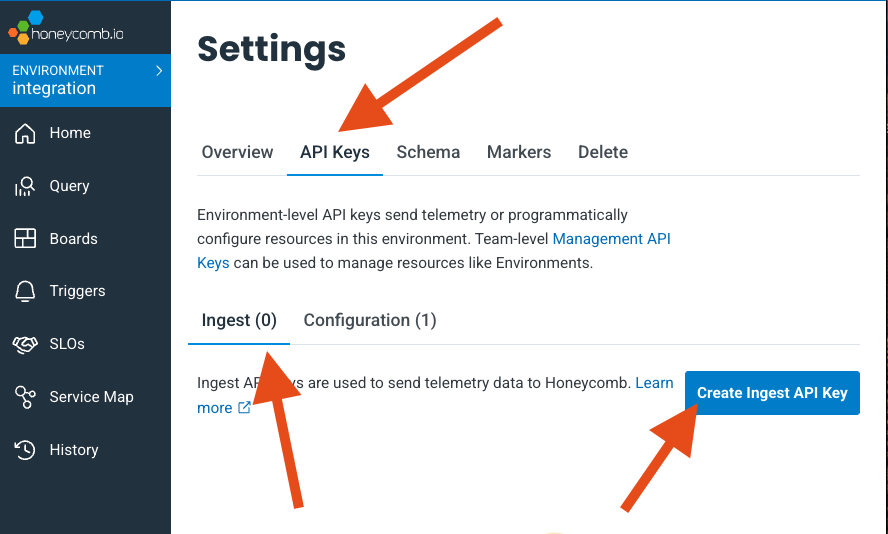
 From the Settings page, click on the **API Keys** tab, make sure you are on "Ingest" sub-tab and click on the **Create Ingest API Key** blue button on the right.
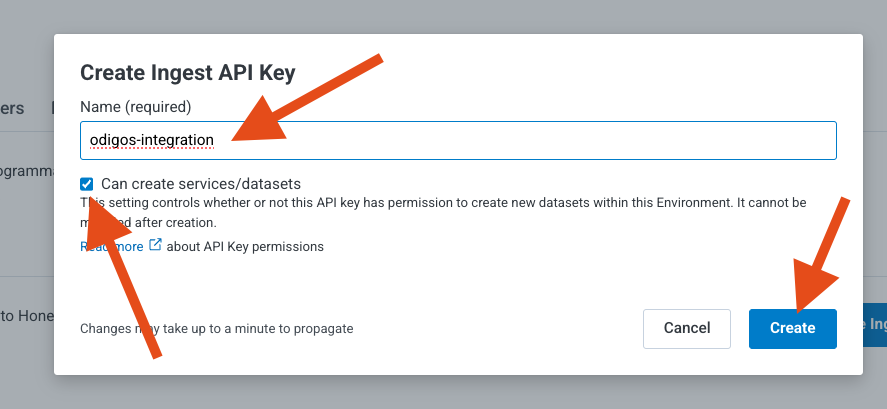
 Give your API Key a name (include "odigos" in the name to identify it easily later on), make sure the checkbox for "Can create services/datasets" is checked, and click the **Create** button on the modal bottom right.
 Copy the ingest key to keyboard and paste it in your Honeycomb Odigos destination configuration (ui or kubernetes manifest).
### Configuring Destination Fields
✅ Traces
✅ Metrics
✅ Logs
❌ Profiles
* **HONEYCOMB\_API\_KEY** `string` : API Key.
* This field is required
* **HONEYCOMB\_ENDPOINT** `string` : Endpoint. Choose one of the endpoints in the dropdown (`api.honeycomb.io` is the US instance, `api.eu1.honeycomb.io` is EU instance)
* This field is required
### Adding Destination to Odigos
There are two primary methods for configuring destinations in Odigos:
##### **Using the UI**
Use the [Odigos CLI](https://docs.odigos.io/cli/odigos_ui) to access the UI
```bash theme={null}
odigos ui
```
Click on `Add Destination`, select `Honeycomb` and follow the on-screen instructions
##### **Using Kubernetes manifests**
Save the YAML below to a file (e.g. `honeycomb.yaml`)
```yaml theme={null}
apiVersion: odigos.io/v1alpha1
kind: Destination
metadata:
name: honeycomb-example
namespace: odigos-system
spec:
data:
HONEYCOMB_ENDPOINT: ''
destinationName: honeycomb
secretRef:
name: honeycomb-secret
signals:
- TRACES
- METRICS
- LOGS
type: honeycomb
---
apiVersion: v1
data:
HONEYCOMB_API_KEY:
kind: Secret
metadata:
name: honeycomb-secret
namespace: odigos-system
type: Opaque
```
Apply the YAML using `kubectl`
```bash theme={null}
kubectl apply -f honeycomb.yaml
```
Copy the ingest key to keyboard and paste it in your Honeycomb Odigos destination configuration (ui or kubernetes manifest).
### Configuring Destination Fields
✅ Traces
✅ Metrics
✅ Logs
❌ Profiles
* **HONEYCOMB\_API\_KEY** `string` : API Key.
* This field is required
* **HONEYCOMB\_ENDPOINT** `string` : Endpoint. Choose one of the endpoints in the dropdown (`api.honeycomb.io` is the US instance, `api.eu1.honeycomb.io` is EU instance)
* This field is required
### Adding Destination to Odigos
There are two primary methods for configuring destinations in Odigos:
##### **Using the UI**
Use the [Odigos CLI](https://docs.odigos.io/cli/odigos_ui) to access the UI
```bash theme={null}
odigos ui
```
Click on `Add Destination`, select `Honeycomb` and follow the on-screen instructions
##### **Using Kubernetes manifests**
Save the YAML below to a file (e.g. `honeycomb.yaml`)
```yaml theme={null}
apiVersion: odigos.io/v1alpha1
kind: Destination
metadata:
name: honeycomb-example
namespace: odigos-system
spec:
data:
HONEYCOMB_ENDPOINT: ''
destinationName: honeycomb
secretRef:
name: honeycomb-secret
signals:
- TRACES
- METRICS
- LOGS
type: honeycomb
---
apiVersion: v1
data:
HONEYCOMB_API_KEY:
kind: Secret
metadata:
name: honeycomb-secret
namespace: odigos-system
type: Opaque
```
Apply the YAML using `kubectl`
```bash theme={null}
kubectl apply -f honeycomb.yaml
```